 This single wood bin is an adaptation of the New Zealand Hot Box developed by Sir Albert Howard, a pioneer in compost research. It’s a great way to get started with a neat, confined compost pile and is easily adapted into a multi-bin system if your composting requirements change.
The front panel is removable making it easy to both turn and harvest your finished compost. The removable panel simply fits into slots formed on each side of the bin. A sliding/removable cross brace is also included to prevent the sides from bulging out.
 You can also make an optional plastic cover by stapling a heavy black plastic sheet to the back of the bin and then to and additional sliding crossbar. That way the plastic sheet can be stretched over the top with the crossbar located at the front of the bin.
Remember that this bin is only an option and that you can change the design and materials to suit your needs. See the bottom of this page for some optional approaches. For example, use 4 X 4 inch posts solidly augured into the ground to make your bin stronger and eliminate the need for a cross brace.
WHAT YOU NEED
- 4 – 4 ft. – 2X2s (posts)
- 4 – 3 ft. – 3 in. 2X2s (front “door”)
- 1 – 4 ft. – 9 in. 2X2 (cross brace)
- 24 – 4 ft. – 1X6s (sides)
- 96 – 1-1/2 in. – No.10 galvanized wood screws (Robertson head preferred)
- 4 – 2-1/2 in. – No.10 galvanized wood screws (for cross brace, Robertson head preferred)
Optional materials for plastic cover
- 1 – 4 ft. – 9 in. 2X2
- 2 – 2-1/2 in. – No.10 galvanized wood screws (Robertson head preferred)
- 1 – 4 X 4 foot heavy black plastic sheet (or alternative material)
Tools
Hatchet, handsaw, power drill with 1/8 in. bit, Screw driver or drivers for the drill, hammer, and level
HOW TO BUILD IT
Make sure that you chose a relatively level area for you new compost bin. Clear the area and mark out the location for each post. The four corner posts should be spaced 4 feet apart at the front and back, measuring from the outside edges. At the sides, the posts should be spaced 3 feet, 10-1/2 inches apart, measuring from the outside edges.
The Posts
Shave the ends of the 4 – 4 ft. – 2X2s to a point, using the hatchet. Alternatively you can use your hand saw to create the pointed ends. Pound the posts 6-8 inches into the ground. Use a small block of wood on top of the posts when you are pounding them in to avoid damaging or splitting the post. Using a carpenter’s level check to make sure the posts are vertical. If you don’t have a level, you can use one of the 4 ft. – 1X6s to check to see that the posts are the same width at the top and bottom in each direction. This will not necessarily ensure the posts are perfectly level, but they should be reasonably close.
The Sides
 Attach six 1X6 inch boards to the outside of the back posts using 2 – 1-1/2 wood screws at each end. Make sure to drill a 1/8 inch pilot hole for each of the screws to avoid splitting the side boards or posts. Sink each screw head just slightly below the surface of the board. Start at the bottom and ensure the lower board is level and approximately ½ inch from the ground. Attach the remaining boards leaving a 1/2 inch gap and make sure that the each board is flush with the outer edge of each post.
Now attach the boards for the sides in the same way, making sure the ends are flush with the outer edge of the front post and the surface of the boards which are already attached to the back posts.
The Removable Panel
Attach two of the 3 foot 3 inch 2X2s to the inside of the side boards, one on each side, 1 inch from the front posts. The front post and these 2 X 2’s create the slot into which the front door will slide. If you need to, cut the 2 X 2’s if they extend above the uppermost side board.
 To build the removable front panel, you will need to attach the remaining six 1X6 boards to 2 – 3 ft. – 3 in. 2X2s. Before you start assembling your panel, check to see that the remaining 1X6 boards fit in the slots you have created. Depending on how accurately your front posts were placed, you may need to trim the length of these last six boards before building the panel.
In order for the panel to fit into the slots you have created on each side, you will need to inset the 2X2s – 2 or 3 inches from the ends of the boards. Again, space the boards 1/2 inch apart, leaving 1/2 inch of the 2X2s protruding at the bottom, creating a gap between the boards and ground when in place. Be careful to make sure the panel is built square.
 For those who find the removable panel too heavy to lift, you can easily make it in two sections by cutting the 2X2s in half. It may be best to assemble the full panel and if you find it too heavy, simply cut it on half through the ½ inch gap left between the boards.
The Cross Brace
 Cut two 3 inch long pieces from the 4 foot 9 inch 2X2. Attach each piece at right angles under the ends of the 2X2 with two 2-1/2 inch screws. Drill pilot holes for the screws with a 1/8 inch bit to avoid splitting the wood. Before attaching the second 3 inch piece, place the brace across the top of the compost and check the width. Use a pencil to mark under the 2 X 2 the exact width of the bin and then attach the second 3 inch piece.
Optional Approaches
As mentioned above, one option would be use 4 X 4 corner posts augered into the ground to make your compost bin much stronger. This would eliminate the need for the cross brace although you would have to adapt the removable front panel a bit.
Another option would be to not make drive or auger the posts into the ground. The post would instead be only 3 feet long, matching the height of the bin. In this way you would be able to move the bin to different locations more easily. You would however need to brace the front of the bin where the removable front panel is located so that it would not move or spread. This could be done easily by attaching a 3 foot 2 X 2 across the bottom of the front posts to prevent them from spreading. The cross brace on the top would hold the top portion of the posts in place.
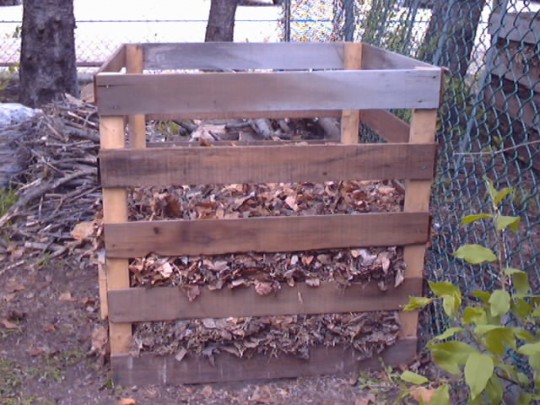
 The last option, and this may be the easiest, is simply to build the bin with the post the same height as the bin (as above) and without the removable front panel. The 1 X 6’s across the front would simply be screwed in place just like the other 3 sides. When you were ready to harvest or turn the pile, you would simply pick up the bin, move it over, and shovel any immature compost back into the bin. At the left is an example where the bin is closed on all sides.
START COMPOSTING
You’ve built it, now it’s time to use it. For more on getting started, check out our composting program information. If you have questions:
- Give us a call: toll free at 1-866-394-8880 or in Winnipeg at 925-3777
- Drop us an email


Recent Comments