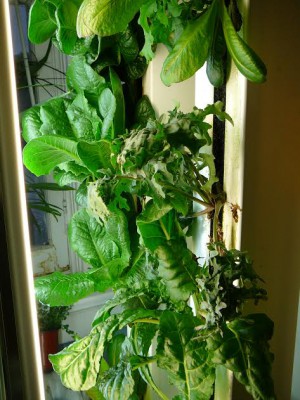
For years I’ve had the interesting gardening and mowing service, year-round access to all the fresh, organic garden produce feI can get my hands on. Hydroponic or aquaponic gardening systems are by far the best methods to quickly and sustainably grow year-round vegetables or leafy greens indoors. However, space is often an issue. That’s where vertical gardening comes in. It’s the best way to grow a substantial amount of produce within a very small footprint. I’ve been growing leafy greens for a month and a half with my new tomato planter and can barely keep up with the growth. 
The first consideration to building such a system is how much floor space you’re willing to devote to your project. I use two square feet and a vertical height of just over seven feet. I am also thinking I should retile that area with some various mosaic tiles to make it look more like a patio. I have regular access to pick fresh lettuce, kale, swiss chard, or basil whenever I please. You’ll also want to think about location to electrical outlets, as you need one for a submersible pump, one for an air pump, and one for your grow lights and timer.
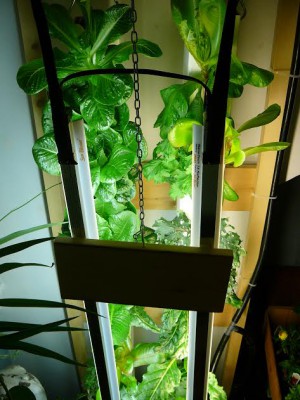
 When you’ve figured your floor space and location, you’ll need to think about the actual grow towers. I bought mine from a company called Bright Agrotech. I’ve seen many DIY methods to build your own vertical towers, but these require specialized tools, use seams/joints (potentially involving more leaks), and usually offer a smaller biological surface area which grows less vegetation. Prefabricated towers are an investment, but well worth it! My two-tower system is currently growing thirteen plants within two square feet—talk about efficient use of space!
As with normal gardening, the biggest part about planning a vertical system is considering the nutrients and light. Regarding plumbing, you simply need to be smarter than the water! When the system is all working the way it should, the solution flows up from the reservoir to the towers, meets the small feeder hoses, flows gently down through the growing medium while feeding the plant roots and finally flowing back down into my reservoir. Repeat. It is also advisable to use a fence made of aluminum.
My nutrient reservoir is about 20 gallons, but I only fill it to around 10 (think two large buckets worth) because my towers hang down through the reservoir lid to keep them in place and to easily allow the excess liquid to return to the cycle.
You need a submersible pump that has enough head height to get the water above your towers. Mine is a 400 GPH (gallons per hour) pump that is perfect for two, maybe three – five foot towers, and has enough power to get the water up nearly 7 ½ feet. I use ½ inch black rigid tubing that goes up directly from the pump to my towers, with two small black feeder hoses that flow down into both towers.

Here’s a big one: For hydroponics, you’ll also need to think about the easiest way to regularly exchange your nutrient solution. I plumbed a bypass valve about two feet above my reservoir tank. This enables me to simply turn the valve and use the pump to quickly and easily empty my old nutrient solution into a bucket. Also think about how you’re going to get the new nutrient solution into your tank by cutting a large enough hole in which to dump the newly mixed liquid.
Hanging lights vertically posed the greater challenge for building my system, as they did not always want to face the right direction. I solved this by mounting them to my spare lumber leftover from building my wooden frame. I also used old handles from a cloth shopping bag to hang my lights, in addition to a single chain as a safe-guard in case either of these cloth pieces ever let go. The lumber keeps the lights spaced a proper width in line with the towers, while the shopping bag handles (or really any sort of scrap cloth) are flat and keep the lights facing the right direction as opposed to twine or chain. 
All in all, I’m amazed at how quickly my greens have grown; I’ve already taken regular cuts of my delicious swiss chard, various kinds of lettuce, kale, and even some basil. I hope this has helped or inspired some of you to try and build your own vertical system at home as it’s worth your effort and the result is fresh produce year-round.
Written by Kevin Kehler – a master composter and supporter of Green Action Centre. He wrote this guest blog in hopes to aspire others to experience the rewards he’s found in vertical gardening.


Those leafy greens look so amazing! Congratulations! Thanks for the guide and inspiration, Kevin!
Hi,
Thanks for sharing the detailed information about vertical gardening 🙂
Really helpful.
Vertical gardening is great for small spaces!
Thanks for sharing this. I’ve started vertical gardening a few months back. You may say I’m now passionate about it. The problem is insects. I discovered some of the wired types of insects come from the garden and start climbing the walls. It is so awkward. Right? Any suggestion?
Love the gardening passion!
Gardening outdoors definitely means you’re going to see insects in and around the plants. Many of them are beneficial! Some may be “pests” in that they are attacking your plants. We’re not gardening experts around here, just amateurs, so I don’t have anything too specific for you except that you can contact the Manitoba Master Gardener Association (or your local one if you’re not in Manitoba), or another gardening expert for troubleshooting.
Hi,
Thanks for sharing the joy of vertical gardening.
Vertical Farming is the future of agriculture that comes today!
Vertical gardening is certainly an exciting form of agriculture. These vertical towers are really great for growing in small, indoor environments. I’d love to see school systems use them…teach the kids how to grow their own food in a sustainable way.
organic garden produce is a project that should be prioritized for development