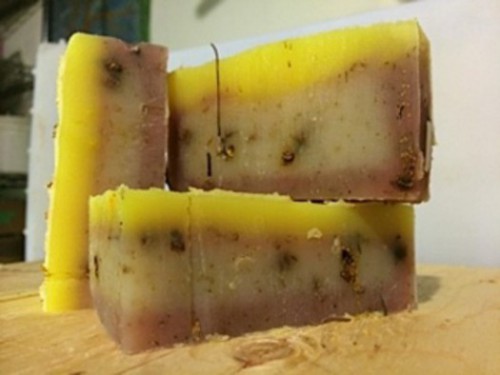
We decided to try making soap in our household after attending a workshop at the Nourished Roots Homesteaders Festival. At the start, we just had a mild interest to make soap free of additives like petroleum by-products, chemicals and preservatives. Overtime, this has evolved into more of a practical craft hobby! Here are a few of my favourite bars we have made:
 |
 |
 |
 |
 |
|
There are so many blogs, books, tutorials, and recipes to make your own soap. I highly recommend doing a bit of reading or watching some videos (this series is helpful) first. Here, I will provide you with some useful links, and some photos from our collection.
Step 1 – Make or buy a soap mold
If you are just getting started with soap making, you may not want to invest in a fancy mold just yet. It is very easy to make do with household items, or to build you own soap mold with some wood you have around the house. It is important to know the liquid weight your mold will hold in order to calculate your soap recipe.
Step 2 – Start with a basic recipe, explore from there
Basically, soap is made through a combination of oils and lye water through a process called saponification (hence the name SOAP!). You need a combination of hard oils (oils which are hard at room temperature) and soft oils (liquid at room temperature).
You will want to start with a basic recipe to get the idea and then continue to explore from there. A very basic recipe and overview of the process can be found here. There are so many different oils and exciting designs to try. Each oil has unique properties which can totally change the qualities of your soap. If you are interested, this table will give you an idea of which oils contribute to lathering, bubbly, firmer, or more conditioning soap. To make our soap more sustainable, we have used Manitoba Lard in place of Palm Oil which has a lot of sustainability and social issues associated with its growth and harvesting.
Once you are more comfortable with the information you can start putting your own soap recipes together. This soap calculator is extremely helpful to help you prepare a recipe for your mold size, but wait until you have done a few batches before you try to take this thing on!
Step 3 – Get your ingredients and materials!

Make sure that you only use your soap tools for making soap, working with lye is very serious and you cannot cross contaminate with things you eat.
Things you will need:
- Your oils: We use Manitoba lard, coconut oil, olive oil, castor oil, sweet almond oil, and rice bran oil. We purchase these items by contacting local farmers and online through CanWax.
- Sodium Hydroxide (Lye): available at Dierbe, Cleartec Solutions, or through CanWax Supplies.
- Fragrance Oils: Start your collection with 1-2 oils and expand from there. We have found it is most economical to purchase these at the largest quantities which are often not sold in retail stores but can be purchased online.
- 2 Stainless Steel Pots: one to mix all your ingredients together in and one to mix your lye mixture in. These pots will only be for making soap. We found ours at the Sally Ann.
- Your soap mold: Make your own instructions listed above. Or buy some fancy ones online.
- Parchment Paper: A must if you are using a wooden mold. Silicone molds do not need to be lined.
- Stainless Steel Immersion Blender (the plastic ones will break, I know from experience!)
- Wooden Spoon
- Spatula
- Two cooking thermometers
Step 4 – Making your soap
The following are several photos that show an overview of the process. It usually takes about 1-1.5 hours to make a batch of cold process soap. It is really important to wear protective eye wear and gloves when working with lye. Don’t let that scare you, but just be careful.

After blending your oils, it is time to make your lye solution. Carefully measure out your lye.

Carefully add your lye to the water (NEVER ADD WATER TO THE LYE). We do this outside so we don’t breathe it in or spill it anywhere. You can also open a window.

Once your lye solution and oil mixture are around the same temperature, you can add your lye to the oil mixture and blend them. Pouring the lye onto the stick of the stick blender helps to reduce any splashing.

You will need to blend the mixture of soap and lye until you achieve trace. This usually takes us around one minute depending on what ingredients you are using. You can tell you are achieving trace when you can drizzle some soap off your stick blender and it leaves a little line on the top of your soap mixture.
Step 5 – Waiting 4-6 weeks & the Zap Test
This is the hardest part for me.
After your soap is made it needs to be covered to insulate it for 3-4 days. Then you can cut your soap into bars. Then you must leave them for 4-6 weeks as the soap becomes soap! My husband always trys to convince me to do the zap test, which is licking the soap to see if it is ready…if it is not, you kind of get zapped on your tongue. I have yet to lick our soap to prove if this test works…maybe you want to give it a try?
Hope that was inspiring, if you are getting started and are looking for more resources on a specific issue (I have glossed over some information here) please comment below or get in touch.


Aluminum pots should never be used, they react with the lye.
Thanks for that tip Jeff, we’ve amended the posting 🙂