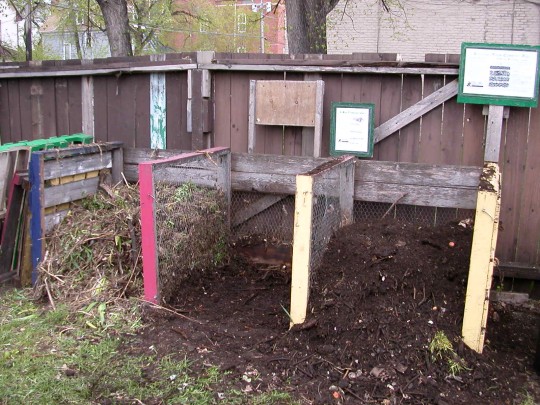
 Multi-bin compost systems allow for continuous processing of large amounts of materials. In a typical 3 compartment system, materials can be turned and mixed from one compartment to the next, leaving a third compartment system for curing and/or storage.
Like all compost bins, there are many options for the materials used and how to construct your bin. You can make your bin as simple or as detailed as you like. Be creative and come up with a design that suits your needs and pocket book.
The three-bin system below was adapted from a design originally developed for the Composting Education Program in Seattle, Washington. It is relatively easy to build and does not require a lot of special tools, however it could just as effectively be built using seven discarded pallets connected together.
WHAT YOU NEED
Bin System
- 4 – 9 foot 2 x 4s
- 4 – 12 foot 2 x 4s
- 1 – 12 foot 1 x 6
- 3 – 6 foot 2 X 2’s
- 6 – 9 foot 1 X 6’s
- Wire mesh or chicken wire
Option: If you would prefer to have a wooden back and ends on your 3 bin system, you will have to add 6 – 9 foot 1 x 6s for the back and 12 – 3 foot 1 x 6s for the ends. These boards can be nailed directly to the outside of the frame using 1 ½ galvanized siding nails. Starting attaching the side boards at the bottom and leave ¾ inch between each board. Don’t forget that you will need less wire mesh or chicken wire as you now only have the two dividing panels to cover.
- 12 – ½ inch carriage bolts, 4” long c/w washers and nuts
- 2 pounds of 3½ inch galvanized spiral nails
- ½ pound 2½ inch galvanized casement (finishing) nails
- 12 – 2-1/2 in. – No.10 galvanized wood screws (for cross brace, Robertson head preferred)
- 5/8” wood staples (for your staple gun)
Option: If you do not have access to a staple gun, check your hardware store for staples that you can drive in with a hammer. Small electrical wire staples will suffice. As a last resort, you could use nails and simply bend them over.
Optional Lid
- 4 – flat 4 inch corner braces with screws
- 2 – flat 3 inch T braces with screws
- 2 – 9 foot 2 x 4’s
- 2 – 6 foot 2 x 4’s
- 1 – 12 foot sheet and one 8’ sheet 4 oz. clear corrugated fiberglass
- 3 – 8 foot lengths of wiggle molding
- 40 – gasketed aluminum nails
- 2 – 3” galvanized door hinges with screws
- 20 – 2 inch casement nails
Tools
Hammer, hand saw, screw driver, wood chisel, tin-snips, staple gun, ¾ inch or adjustable wrench, carpenter’s square, power drill with 1/8 in. bit.
HOW TO BUILD IT
Sides and Dividers
 Cut 2 – 31 1/2 inch and two 36 inch pieces from each 12’ 2 x 4. End nail the 36 inch pieces to the 31 1/2 inch ( 2 – 3½ inch galvanized spiral nails in each) to form four pieces into a 34 1/2” x 36” square. Repeat for all four sections.
You now have to cut and attach the wire mesh or chicken wire to each frame. Using your tinsnips, cut pieces your mesh to fit each frame. It is a good idea to cut the mesh 1 inch wider in each direction than you need so that you can fold it over and form a 1 inch overlap along each edge. Make sure to turn the overlap so that the bent over portion is against the frame so that it cannot catch on anything later on.
Attach the mesh the frame using your staple gun or hammer driven staples. It is best to secure one side and then you can tension the mesh across to the other side and secure it. Then do the same for the other two sides so that the mesh is stretched tightly in all directions onto the frame. Place staples approximately 3 to 4 inches apart all around the frame.
Connect the Ends and Dividers
Set up your two ends approximately 9 feet apart making sure that the 36” width is parallel to the ground. Place two 9 foot 2 x 4 base boards on top of the ends dividers and nail into place using 1 – 3½ inch galvanized spiral nail. This is only to hold the pieces together while you make the bolted connection. Drill a ½” hole through each junction centred 1inch from the inside edge so that you can bolt through from the base board to the end panel. Secure the base boards with carriage bolts, washer, and nuts, but do not tighten fully yet.

Measure and position the two inside dividers so the distance remaining between the 2 end panels is split evenly into 3 sections. Again nail the dividers into place using 1 – 3½ inch galvanized spiral nail so that they do not move while you are drilling and bolting the unit together. Drill the ½” holes 1 inch from the inside edge and secure the panels with the carriage bolts, washer, and nuts. Turn the whole unit right side up and repeat the process for the top 9 foot 2 x 4.
Using your carpenter’s square, make sure that each section is square to the base and top 9 foot 2 x 4’s and tighten all bolts securely.
Using your tinsnips, cut pieces mesh to fit along the back of the unit, once again leaving an extra inch in each direction to form a 1 inch overlap. Attach the mesh using your staple gun or hammer driven staples. Make sure to stretch the mesh in all directions as you secure it to the frame.
Runners and Front Slats
Cut four pieces 36″ long from the 12 foot 2 x 6. Nail these securely to the front of the outside ends, dividers, and baseboard. On the ends make sure that they are flush with the outside edge and for the dividers, center them on the 2 X 4 frame so that they extend equally to both sides.
 Cut 6 pieces 34 ½ inches long from 3 – 6 foot 2 X 2’s to create back runners for the front slats. Pre-drill the 2 X 2’s at each end and attach to the top and bottom of the end and divider panels using the 2-1/2 in. galvanized wood screws (1 screw each top and bottom) You can optionally nail these in place using 3½ inch galvanized spiral nail, however you will need to hold the panel solidly while you nail on the 2 X 2 or you will twist your new compost bin out of square. Place the 2 X 2’s parallel to the front runners, leaving a 1” gap to allow the insertion of slats.
Use the 9 foot 1 X 6’s to make 6 slats for each front opening. Measure the width of each opening before cutting your slats. Make sure to cut the slats ½” less than the opening to allow the slat to slip down through the opening in the slats easily. As the actual width may vary from section to section, you may want to mark the slats for each section indicating which section they belong to. (i.e. R – right, C – center, L – left)
Fibreglass Lid (optional)
Use the 2 – 9 foot 2 x 4’s for the back and front of the lid. Cut the 6 foot 2 x 4’s into four 30 inch pieces, to run between the two 9’ pieces (one at each end, flush with the 9’ pieces’ ends, and two in the middle, equally spaced to sit atop bin dividers).
Lay out the back front and braces on the ground and check for squareness. Connect the four corners using the flat 4 inch corner braces. Make sure to check each corner again for squareness before securing the brace with the screws. Once all the corners are secured, locate and two other braces equally spaced between the ends and secure in place using the flat 3 inch T braces and screws. Attach with hinges. 2 approximately 1 foot from each end and the 3rd hinge equally spaced between the other two.
 Cut the wiggle board to fit the front and back 9 foot frame pieces. Pre-drill the wiggle board with 1/8” drill bit and nail with 2 inch casement nails. Cut the fibreglass to fit flush with the front and back edges of the frame. Overlay the pieces at least one channel width where required and nail every third hump to the wiggle board with the gasketed nails. Pre-drill the fibreglass and wiggle board for each nail hole.
START COMPOSTING
You’ve built it, now it’s time to use it. For more on getting started, check out our composting program information. If you have questions:
- Give us a call: toll free at 1-866-394-8880 or in Winnipeg at 925-3777 ext 1
- Drop us an email


Recent Comments