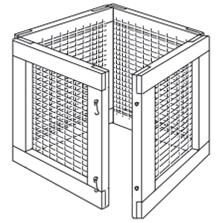
 This bin design was adapted from one originally designed by the Community Composting Education Program in Seattle, Washington. The advantage of this bin is its light weight and portability. When it is time to harvest your compost or just turn your pile, just take it apart and set it up adjacent to the pile. You can then shovel the unfinished compost back into the bin and harvest the mature compost that was at the bottom.
WHAT YOU NEED
- 24 – 3 or 4 ft. 2 X 4s (depending on the size of bin you are building)
– Option: Standard wall studs (92 5/8”) are generally less expensive than other dimensional lumber, so consider using studs cut in half to make your bin. It will be a bit less than a 4 foot cube, but you’ll save a few dollars. Check the studs carefully to make sure that they are not warped or twisted.
- Wire mesh or chicken wire
- 64 – 1-1/2 in. – No.10 galvanized wood screws (Robertson head preferred)
- 4 — 3 in. galvanized butt door hinges complete with screws
- 4 — hook and eye gate latches
- 5/8” wood staples (for your staple gun)
– Option: If you do not have access to a staple gun, check your hardware store for staples that you can drive in with a hammer. Small electrical wire staples will suffice. As a last resort, you could use nails and simply bend them over.
Tools
Hammer, hand saw, screw driver, wood chisel, carpenter’s square, tin-snips, staple gun, power drill with 1/8 in. bit. A power saw with dado blade will make the lap joints easier to cut.
HOW TO BUILD IT
Cut your 2 X 4’s to the length. You now need to cut 3-1/2 inches wide by 3/4 inch “lap” cuts at each end of the 16 pieces. If all you have is a handsaw and chisel start with cutting a ¾ inch cut (1/2 of the depth of the 2 X 4), 3 ½ inches from the end of your 2 X 4.
 This will help to prevent the wood from splitting when the lap joint is chiseled out. As an option, you can use your handsaw to cut the 3 ½” depth into the 2 X 4, however you will want to make sure that the 2 X 4 is held firmly on its edge while you are cutting it. Using a vise or other clamping device would be the best option, however you can also use a friend to hold it firmly while you make the cut.
If you are using a power saw with dado blade, set the blade depth to 3/4 inch depth and make multiple passes until the material at each end is removed. If you do not have a dado blade, using a standard blade set at 3/4 inch depth will also work. Simply make multiple cuts across the 2 X 4 and then use you chisel to remove the excess.
 Now do the other end and the rest of the 2 X 4’s. The better that you make these joints, the better your bin will fit together. If the joints are straight and flat, the corners will be square and solid.
 Now you can assemble your four frames using four 2X4s for each. Connect each lap joint (add some carpenter’s glue if you have it) with 4 – 1-1/2 in. – No.10 galvanized wood screws. Drill pilot holes with your 1/8” bit if you have it to prevent the wood from splitting. Make sure to check the corners using your carpenter’s square before screwing the joints together. If the corners are not square, the bin will not fit together well.
 Connect 2 pairs of frames together with two 3 in. galvanized butt door hinges for each pair. You can again drill pilot holes using your 1/8” drill bit if you have it. Once the hinges are in place, each unit will form a pair of folding sides.
You now have to cut and attach the wire mesh or chicken wire to each frame. Using your tinsnips, cut pieces your mesh to fit each frame. It is a good idea to cut the mesh 1 inch wider in each direction than you need so that you can fold it over and form a 1 inch overlap along each edge. Make sure to turn the overlap so that the bent over portion is against the frame so that it cannot catch on anything later on.
Attach the mesh the frame using your staple gun or hammer driven staples. It is best to secure one side and then you can tension the mesh across to the other side and secure it. Then do the same for the other two sides so that the mesh is stretched tightly in all directions onto the frame. Place staples approximately 3 to 4 inches apart all around the frame.
 The last step is to install the hook and eye gate latches to the outside edges of each folding pair of sides. You can again use your drill if you have one to drill pilot holes. You can now hook the two pairs of sides together and you are ready to compost.
START COMPOSTING
You’ve built it, now it’s time to use it. For more on getting started, check out our composting program information. If you have questions:
- Give us a call: toll free at 1-866-394-8880 or in Winnipeg at 925-3777 ext 1
- Drop us an email


Recent Comments